
On this page
- What Soil Actually Is (and Isn’t)
- Figuring Out What Kind of Soil You Have
- How to Improve Any Soil — The Universal Answer
- Why Compost Is the Center of Everything
- How to Make Compost — The Actual Process
- Troubleshooting Your Compost
- Other Soil Amendments Worth Knowing
- Keeping Soil Healthy Year After Year
- Frequently Asked Questions
- The Garden Is the Soil
Every successful garden is built on the same secret, and it isn’t a secret at all: the soil. Not the plants, not the tools, not the watering schedule, not the fancy fertilizer. The soil. Two gardens with identical plants, identical weather, and identical care will produce wildly different results if one has healthy, living soil and the other has exhausted dirt. Experienced gardeners stop talking about growing plants at some point and start talking about growing soil — and the plants, it turns out, mostly take care of themselves when the soil is right.
This guide covers what a beginner needs to know about soil and composting — not as two separate topics, but as one connected system. You’ll learn what soil actually is, how to tell what kind you have, how to make it better, and how to turn your household waste into the most valuable amendment your garden will ever get. Nothing in gardening returns more value per hour invested than time spent building your soil.
What Soil Actually Is (and Isn’t)
Most people think of soil as inert brown stuff that holds plants up. Soil is actually one of the most complex living ecosystems on earth. A single handful of healthy garden soil contains billions of bacteria, millions of fungi, thousands of protozoa, and countless tiny invertebrates — all working together to break down organic matter, release nutrients, and support the plants growing in it.
Good soil is roughly 45% mineral particles (sand, silt, clay), 5% organic matter, 25% water, and 25% air. Those proportions aren’t trivia — they explain why compacted, waterlogged, or bone-dry soil all fail to grow healthy plants. Roots need oxygen as much as they need water. Soil organisms need moisture as much as they need food. The structure of soil matters as much as its chemistry.
Three terms to know before you go further:
- Soil texture: The proportion of sand, silt, and clay particles. Texture is fixed — you can’t change it meaningfully. Sandy soil drains fast and doesn’t hold nutrients; clay soil holds water and nutrients but drains poorly; loam (the ideal) has balanced proportions of all three.
- Soil structure: How soil particles clump together. Structure can be changed, and almost everything you do as a gardener affects it — for better or worse.
- Organic matter: Decomposed plant and animal material. More organic matter improves nearly every aspect of soil — structure, moisture retention, nutrient availability, biological activity. Building organic matter is the single most productive thing you can do to soil.

Figuring Out What Kind of Soil You Have
Before you decide what to do to your soil, spend ten minutes learning what you’re working with. This is one of the highest-return tasks in all of gardening — and it costs nothing.
The Squeeze Test
Grab a handful of damp (not wet) soil and squeeze it into a ball in your fist. Open your hand and poke the ball gently.
- Falls apart immediately: Sandy soil. Drains fast, doesn’t hold nutrients well, warms up early in spring. Plants dry out quickly.
- Forms a ball that crumbles when poked: Loam. The ideal garden soil. If you have this, thank whoever had the yard before you.
- Forms a sticky ball that holds its shape: Clay-heavy soil. Holds water and nutrients well but drains poorly, compacts easily, and is slow to warm in spring. Hard when dry, gummy when wet.
Most yards fall somewhere between these extremes. “Sandy loam” and “clay loam” are common — mostly good with some tendency toward one end or the other.
The Jar Test (More Precise)
For a more detailed picture: fill a clear quart jar one-third with soil, fill the rest with water, add a drop of dish soap, shake vigorously, and set it aside for 24 hours. The soil particles settle in layers — sand at the bottom (settles first, within minutes), silt in the middle (settles over hours), and clay on top (takes a full day or more). Measuring each layer gives you rough percentages of each particle type.
pH: Worth Testing
Soil pH — its acidity or alkalinity on a 1-to-14 scale — dramatically affects which nutrients plants can absorb. Most vegetables and ornamentals prefer a slightly acidic to neutral pH (6.0–7.0). Blueberries and azaleas need acidic soil (4.5–5.5); lavender and some Mediterranean herbs prefer slightly alkaline (7.0+). A simple home test kit costs little and gives a rough reading; your county extension service often provides more precise testing for a small fee.
Adjusting pH takes time. Adding sulfur lowers pH; adding garden lime raises it. Changes happen over months, not days, so apply in fall for a spring effect. Don’t make big pH adjustments without testing — dumping lime or sulfur into soil that didn’t need it causes its own problems.
Full Soil Testing
A full soil test from your state extension service (usually $20–40) reports texture, pH, major nutrients (nitrogen, phosphorus, potassium), organic matter percentage, and sometimes micronutrients. For a vegetable garden or before a major investment in perennials, a full test is worth doing once to establish a baseline. For casual ornamental gardening, the squeeze test and a pH reading are usually enough.

How to Improve Any Soil — The Universal Answer
There’s good news about problem soils: the same thing fixes almost all of them. Add organic matter. Add more organic matter. Keep adding organic matter.
Sandy soil holds more moisture and nutrients when you add organic matter. Clay soil drains better and becomes less compacted when you add organic matter. Exhausted soil regains fertility when you add organic matter. Thin soil builds depth when you add organic matter. It’s almost suspicious how universal the answer is, but it’s genuinely true: compost, aged manure, leaf mold, and other decomposed organic material transforms soil over time.
How Much, How Often
For existing garden beds, a one-to-two-inch layer of compost applied annually in spring or fall works wonders. Spread it on top of the soil and either work it lightly into the top few inches or simply mulch over it and let worms incorporate it naturally over time. In three to five years of consistent application, even poor soil becomes genuinely productive.
For new beds in poor soil, be more aggressive. A three-to-four-inch layer of compost worked into the top 8–12 inches at bed creation gives new plants a huge head start. Then maintain with annual one-to-two-inch top-dressings.
Don’t Add Sand to Clay (or Vice Versa)
The oldest bad advice in gardening is to “lighten up clay soil by adding sand.” Adding sand to clay without adding large amounts of organic matter produces something close to concrete. The sand particles lock into the clay matrix and make things worse, not better. The answer is always organic matter, regardless of what texture you started with.
Build Up, Not Down
For genuinely difficult native soil — hardpan, heavy clay subsoil, rocky ground — building raised beds or mounded rows on top of the existing soil is often easier than trying to fix what’s there. Add six to twelve inches of quality soil and compost on top, and garden in that while the beneath layer slowly improves through root penetration and worm activity. This approach works in almost any situation, including yards where the topsoil was stripped during construction.

Why Compost Is the Center of Everything
Compost is partially decomposed organic matter — the end result of plants and other organic materials breaking down into dark, crumbly, sweet-smelling soil-like material. It’s not a fertilizer in the synthetic sense (it doesn’t deliver a concentrated nutrient hit), but it does something far more valuable: it feeds the entire soil food web and releases nutrients slowly as plants need them.
What compost does, all at once:
- Improves soil structure — lightens clay, helps sand retain moisture
- Slowly releases balanced nutrients over months or years
- Feeds beneficial soil bacteria and fungi
- Increases moisture retention
- Improves drainage (simultaneously, which sounds contradictory but isn’t)
- Buffers pH toward neutral from either direction
- Suppresses some soilborne diseases
- Adds organic matter that supports worm populations
No single purchased product does all of this. And compost, uniquely among soil inputs, is something you can make at home from materials you’d otherwise throw away.
How to Make Compost — The Actual Process
Composting sounds technical until you realize it’s what happens to every pile of leaves in the woods with no human help at all. Organic matter decomposes naturally. Your job as a composter is just to do this intentionally, in one spot, at a manageable speed.
What to Compost
Compost ingredients split into two categories, balanced roughly equally by volume for best results.
“Greens” (nitrogen-rich, wet materials):
- Vegetable and fruit scraps from the kitchen
- Coffee grounds and tea bags (remove staples)
- Fresh grass clippings (in thin layers — thick layers mat and stink)
- Plant trimmings from the garden
- Eggshells (crushed)
“Browns” (carbon-rich, dry materials):
- Fallen leaves (the single best compost ingredient)
- Straw or hay
- Shredded newspaper or plain cardboard (not glossy)
- Wood chips or sawdust (in moderation)
- Dried garden debris at end of season
What Not to Compost
- Meat, fish, dairy, oily foods: Attract rodents and pests, slow to break down, smell bad
- Pet waste (dog, cat): May contain pathogens that home composting doesn’t reliably kill
- Diseased plants: Can carry pathogens that survive and re-infect your garden
- Weeds with mature seeds: Seeds often survive composting and spread when you use the finished compost
- Treated wood, glossy paper, anything synthetic: Contaminants you don’t want in your garden soil
- Black walnut leaves and debris: Contain juglone, which inhibits many garden plants
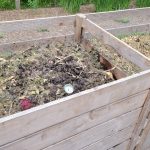
Setting Up a Compost Pile
You don’t need a fancy bin. A three-foot-by-three-foot area in a corner of the yard is the classic starting point — big enough to generate heat, small enough to manage. Options for containing it:
- Open pile: Just a heap on the ground. Works fine, looks messy.
- Wire bin: Three or four fence posts with wire or hardware cloth wrapped around them. Cheap, simple, effective.
- Wooden bin: Four wooden pallets wired together at the corners makes an excellent free composter.
- Commercial tumbler or bin: Pricier but tidy, rodent-resistant, and appropriate for small yards where aesthetics matter.
Place it somewhere sunny or partially sunny, accessible from the kitchen and the garden, and near a water source. Avoid placing directly against wooden structures (it will rot them) or uphill from anything you care about.
Building the Pile
Layer greens and browns roughly equally — a layer of kitchen scraps, a layer of leaves, a layer of grass clippings, a layer of shredded paper. Moisten as you build if materials are dry; the pile should feel like a wrung-out sponge throughout. Keep adding as you go, always covering fresh kitchen scraps with a layer of browns to prevent odors and pests.
Turning or Not Turning
Turning a compost pile — mixing it with a fork every few weeks — adds oxygen, speeds decomposition, and evens out moisture. A regularly-turned pile produces finished compost in two to four months. An un-turned pile takes six to twelve months but works just as well in the end; it’s called “cold composting” and requires no effort beyond adding materials.
For most beginners, cold composting is the right approach. Start a pile, add to it as you have materials, harvest finished compost from the bottom once a year, and let the process take as long as it takes. Faster composting is a bonus, not a requirement.

Troubleshooting Your Compost
A healthy compost pile smells earthy and pleasant, warms up noticeably in the first weeks (hot compost), and shows visible decomposition within a month or two. When something goes wrong, the diagnosis is almost always one of four things.
- Smells like rotting garbage or ammonia: Too much green material, not enough brown. Add shredded leaves, newspaper, or straw and turn the pile to mix.
- Not breaking down at all: Too dry, too small, or all brown material. Add moisture, add greens, and make the pile bigger (smaller piles don’t generate heat).
- Slimy and matted: Usually grass clippings in thick layers. Turn to mix in browns and break up matted clumps.
- Attracting pests: Exposed food scraps. Always bury kitchen scraps under a layer of browns, and keep meat, dairy, and oils out of the pile entirely.
When Compost Is Ready
Finished compost is dark brown or black, crumbly, and smells like forest floor. You shouldn’t be able to identify the original ingredients — leaves, scraps, and other materials have broken down into a uniform texture. Partially finished compost with identifiable chunks still works fine as mulch, but wait until it’s fully broken down before mixing into planting soil; un-decomposed material temporarily ties up nitrogen as it finishes breaking down.
Other Soil Amendments Worth Knowing
Compost is the star, but a few other amendments are worth knowing about for specific situations. All are optional — most gardens do beautifully on compost alone.
- Aged manure (cow, horse, chicken): Rich in nutrients, but must be aged at least six months before use. Fresh manure burns plants and may contain pathogens. Composted manure from a trusted source is excellent; use sparingly, as it’s nutrient-dense.
- Leaf mold: Fallen leaves allowed to decompose for one to two years. Exceptionally good for soil structure, better than most composts for water retention. Essentially free if you have trees.
- Worm castings: The richest form of compost, produced by earthworms. A small amount goes a long way. Available commercially or made at home with a vermicomposting system.
- Rock minerals (greensand, rock phosphate, granite dust): Slow-release mineral sources. Useful for specific deficiencies identified by soil test. Don’t apply randomly.
- Cover crops (clover, vetch, buckwheat, winter rye): Plants grown specifically to be turned into the soil. Add organic matter, fix nitrogen (legumes), and protect bare soil. Excellent long-term soil-building strategy in vegetable gardens.
Keeping Soil Healthy Year After Year
Once your soil is in good shape, maintaining it is mostly about not undoing your work. A few simple habits keep soil improving every year instead of degrading.
Never Leave Soil Bare
Exposed soil loses moisture, bakes in the sun, crusts over after rain, erodes in wind, and constantly spawns new weeds from buried seeds brought to the surface. Cover every patch of soil with either mulch, a living plant, or a cover crop. This single principle does more for long-term soil health than any amendment.
Minimize Tilling
Every time you till, you destroy soil structure you’ve built, kill fungal networks that connect plant roots, and bring weed seeds to the surface. Modern soil science increasingly supports no-till or low-till gardening: add compost and mulch on top, let soil organisms incorporate it, and disturb the soil as little as possible. When you do need to work soil (planting seedlings, harvesting root crops), disturb the smallest area necessary.

Rotate Crops in Vegetable Areas
Growing the same crop in the same spot year after year depletes specific nutrients and concentrates the pests that target that crop. Rotate vegetable families each season — move this year’s tomatoes to where last year’s beans grew, and so on. Even an imperfect rotation makes a real difference over years.
Feed the Soil in Fall
Fall is the ideal time for major soil-building work. Spread compost and leaves on beds after clearing summer crops. Plant cover crops where beds will be empty until spring. The slow winter decomposition leaves the soil ready for spring planting with no additional effort.
Frequently Asked Questions
Do I really need to test my soil?
For most home gardens, a one-time basic test at the start of serious gardening is worth doing. After that, re-testing every three to five years is plenty unless you’re troubleshooting specific problems. For casual ornamental gardening, a pH reading is usually all you need. For vegetable gardens or anywhere you want to avoid guessing, a full extension-service test gives you genuinely useful data.
How long does compost take to finish?
Anywhere from two months (actively managed hot compost) to a year or more (cold compost left alone). Most home piles finish in six to twelve months. Speed isn’t important — a pile finishing in a year is just as valuable as a pile finishing in two months. Start a pile now, and you’ll have finished compost eventually regardless of how much attention it gets.
Will my compost attract rats or mice?
Rarely, if you manage it correctly. The keys: never add meat, dairy, or oily foods, always cover fresh kitchen scraps with a thick layer of browns, and keep the pile moist. In urban areas or high-pressure rodent zones, an enclosed bin or tumbler is a good precaution. Open piles work in most suburban and rural settings with basic discipline about what goes in.
Can I compost in winter?
Yes, though the pile slows dramatically or stops decomposing in cold weather. Keep adding materials through winter — they’ll break down when temperatures rise in spring. Some gardeners in cold climates let material accumulate in a heap through winter and do the serious building and turning work in spring.
Is bagged compost from the store worth buying?
Yes, especially starting out. Quality varies significantly by brand and source — look for reputable products and local brands when possible. Bagged compost from a trusted garden center is a perfectly good shortcut while you build your own composting system. The long-term goal is to produce enough compost yourself that buying becomes optional, but that transition takes a year or two.
The Garden Is the Soil
Everything you’ll read about in gardening books, every technique you’ll watch on videos, every problem you’ll solve with your plants — all of it either depends on your soil or matters less than your soil. A gardener with excellent soil and modest knowledge will produce better results than an expert gardener working with depleted dirt. This is the single most important lesson in gardening, and almost every new gardener discovers it the slow way, after years of focusing on plants and products instead.
Start where you are. Do the squeeze test on your yard’s soil. Start a compost pile with whatever organic matter you have. Mulch every bed. Don’t walk on soil when it’s wet. Add compost in fall, add compost in spring, and keep adding compost. In three seasons, your soil will look different — darker, crumblier, more alive. Your plants will notice before you do.
The best gardeners aren’t magicians. They’re soil builders. Everything else is details.
📷 Featured image by Markus Spiske on Unsplash